先端技術部テクノロジーリサーチグループの渡邊です。 テクノロジーリサーチグループでは、今期から「インダストリアルメタバース」に関する技術調査を行っており、NVIDIAのオープンソースAIロボットJetBotを使って以下のような検証を計画しています。
- AIを使った自律移動
- デジタルツインによる可視化
- デジタルツインによるシミュレーション
前回の記事(AIロボット「JetBot」を動かす - JBS Tech Blog)では、JetBotの組み立てと動作確認を完了しました。 今回はAzure Machine Learning Serviceを活用して、JetBotを動作させる上で必要なAIモデルのトレーニングを行います。
- 前提
- ML Clientのロード
- データセットの準備
- カスタム環境の構築
- トレーニングコンポーネントの構築
- 評価コンポーネントの構築
- MLパイプラインの構築
- MLパイプラインの実行
- 実行結果の確認
- まとめ
前提
JetBotを動作させるソフトウェアとしては、ROS2で実装されたjetbot_rosのNavigation Modelを使用しています。 トレーニング用のスクリプトも用意されていますので、これをそのままAzure Machine Learning上で動かします。
Azure MLのパイプラインは、まずコンポーネント単位で構築し、それを結合する形です。今回のパイプラインを構成する部品は以下の通りです。
- Train
- Evaluate
今回は基本的にデータの前処理などは必要ありませんので、トレーニングを行うコンポーネントと、モデルの評価を行うコンポーネントの二つで構成されます。
ML Clientのロード
Jupyter Notebook上でAzure ML SDK v2を使ってパイプラインの構築を始めましょう。
まずはML Clientをロードします。Azureへの認証は、ブラウザを使って対話的な認証ができるInteractiveBrowserCredentialを使用します。
from azure.ai.ml import MLClient
from azure.identity import InteractiveBrowserCredential

credential = InteractiveBrowserCredential(tenant_id=YOUR_TENANT_ID)
ml_client = MLClient.from_config(credential=credential)
データセットの準備
トレーニングと評価を行いますので、トレーニング用と評価用のデータセットを用意します。詳細は省きますが、手順は以下の通りです。
- JetBot上でタグ付き画像を収集する
- Azure Blob StorageとBlobコンテナを作成する
- 作成したBlobコンテナをAzure Machine Learning Studioのデータストアとして登録する
- 画像をBlobコンテナのサブフォルダ下にアップロードする
- Azure Machine Learning Studioのデータアセット作成から、アップロードしたフォルダを選択し、uri_folder型のデータアセットを作る。
作成したデータアセットは次のように呼び出します。
data_asset = ml_client.data.get("YOUR DATA ASSET NAME", version="1")
カスタム環境の構築
カスタム環境を作ります。conda.yamlでは、モデルのトレーニングを行うために必要なパッケージを定義します。
name: model-env
channels:
  - conda-forge
dependencies:
  - python=3.6
  - pip:
    - pillow
    - torch
    - torchvision
    - mlflow
    - azureml-mlflow
    - pytorch-lightning
以下のコマンドで環境を作ります。
from azure.ai.ml.entities import Environment

custom_env_name = "jetbot_train_env"
pipeline_job_env = Environment(
    name=custom_env_name,
    description="",
    tags={},
    conda_file="conda.yaml",
    image="mcr.microsoft.com/azureml/openmpi4.1.0-ubuntu20.04:latest",
    version="0.5.0",
)
pipeline_job_env = ml_client.environments.create_or_update(pipeline_job_env)

print(
    f"Environment with name {pipeline_job_env.name} is registered to workspace, the environment version is {pipeline_job_env.version}"
)
環境のバージョンは、ml_client.environments.create_or_update()が成功するたびに自動でアップデートされます。
トレーニングコンポーネントの構築
モデルのトレーニングを行うコンポーネントを構築します。YAMLで定義する方法を用いるので、train.ymlを作成します。この中で、先ほど作成したカスタム環境を指定します。
# <component>
name: train_nav_model
display_name: Train JetBot Nav Model
# version: 1 # Not specifying a version will automatically update the version
type: command
inputs:
  data:
    type: uri_folder
  workers:
    type: number
  epochs:
    type: number
  batch_size:
    type: number
  learning_rate:
    type: number
  train_split:
    type: number
outputs:
  model:
    type: uri_folder
  save:
    type: uri_folder
code: .
environment:
  # for this step, we'll use an AzureML curate environment
  azureml:jetbot_train_env:0.5.0
command: >-
  export PYTHONPATH="$(pwd)/imv_jetbot_ros:${PYTHONPATH}" &&
  python ./imv_jetbot_ros/jetbot_ros/dnn/train.py
  --data ${{inputs.data}}
  --workers ${{inputs.workers}}
  --epochs ${{inputs.epochs}}
  --batch-size ${{inputs.batch_size}}
  --learning-rate ${{inputs.learning_rate}}
  --train-split ${{inputs.train_split}}
  --save ${{outputs.save}}
# </component>
作成したYAMLファイルを使って、コンポーネントを作成します。こちらもバージョンが自動的に採番されます。
from azure.ai.ml import load_component

train_component = load_component(source="train.yml")
train_component = ml_client.create_or_update(train_component)
print(
    f"Component {train_component.name} with Version {train_component.version} is registered"
)
評価コンポーネントの構築
トレーニングしたモデルの評価を行うコンポーネントを登録します。まずevaluate.ymlを作成します。 こちらにもカスタム環境を指定します。
# <component>
name: evaluate_nav_model
display_name: Evaluate JetBot Nav Model
# version: 1 # Not specifying a version will automatically update the version
type: command
inputs:
  model:
    type: uri_file
  data:
    type: uri_folder
#outputs:
#  eval_loss:
#    type: number
code: .
environment:
  # for this step, we'll use an AzureML curate environment
  azureml:jetbot_train_env:0.5.0
command: >-
  export PYTHONPATH="$(pwd)/imv_jetbot_ros:${PYTHONPATH}" &&
  python ./imv_jetbot_ros/jetbot_ros/dnn/evaluate.py
  --model ${{inputs.model}}/model_best.pth
  --data ${{inputs.data}}
# </component>
トレーニングコンポーネントと同様に、評価コンポーネントを登録します。
evaluate_component = load_component(source="evaluate.yml")
evaluate_component = ml_client.create_or_update(evaluate_component)
print(
    f"Component {evaluate_component.name} with Version {evaluate_component.version} is registered"
)
MLパイプラインの構築
それでは構築したコンポーネントをつなげて、MLパイプラインを構築しましょう。
パイプラインの入力には、jetbot_ros.dnn.train.pyの引数を定義します。コンピューティングインスタンス(nav-train-compute)は別途作成しておきます。
from azure.ai.ml import dsl

@dsl.pipeline(
    compute="nav-train-compute",  # "serverless" value runs pipeline on serverless compute
    description="",
)
def jetbot_train_pipeline(
    pipeline_job_data,
    pipeline_job_test_data,
    pipeline_job_workers,
    pipeline_job_epochs,
    pipeline_job_batch_size,
    pipeline_job_learning_rate,
    pipeline_job_train_split,
    ):
    # using train_func like a python call with its own inputs
    train_job = train_component(
        data=pipeline_job_data,
        workers=pipeline_job_workers,
        epochs=pipeline_job_epochs,
        batch_size=pipeline_job_batch_size,
        learning_rate=pipeline_job_learning_rate,
        train_split=pipeline_job_train_split,
    )
    evaluate_job = evaluate_component(
        model=train_job.outputs.save,
        data=pipeline_job_test_data,
    )

    # a pipeline returns a dictionary of outputs
    # keys will code for the pipeline output identifier
    return {
        "pipeline_job_model": train_job.outputs.model
    }

registered_model_name = "jetbot_nav_model"

# Let's instantiate the pipeline with the parameters of our choice
pipeline = jetbot_train_pipeline(
    pipeline_job_data=Input(type="uri_folder", path=train_data_asset.path),
    pipeline_job_test_data=Input(type="uri_folder", path=data_asset.path),
    pipeline_job_workers=1,
    pipeline_job_epochs=15,
    pipeline_job_batch_size=1,
    pipeline_job_learning_rate=0.001,
    pipeline_job_train_split=0.8,
)
MLパイプラインの実行
最後に、作成したMLパイプラインを実行します。
※ コンピューティングインスタンスは事前に立ち上げておいてください。
pipeline_job = ml_client.jobs.create_or_update(
    pipeline,
    # Project's name
    experiment_name="jetbot_nav_train_experiment",
)
ml_client.jobs.stream(pipeline_job.name)
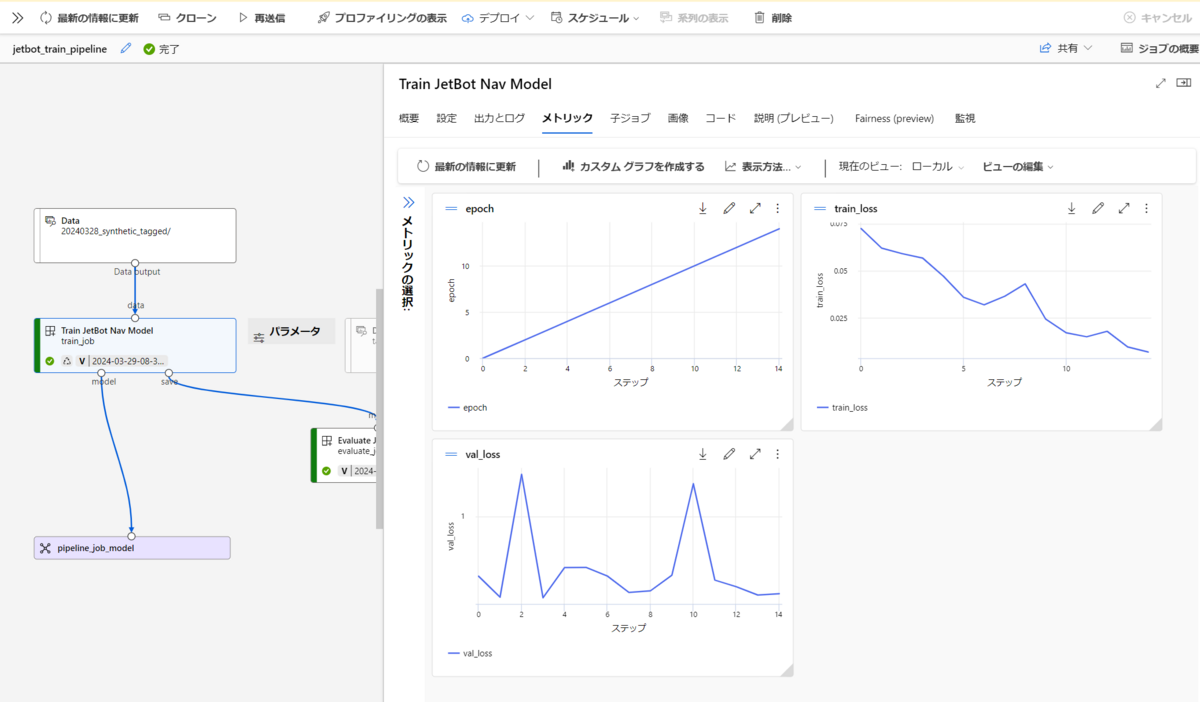
実行結果の確認
実行が完了すると、Azure Machine Learning Studioで結果が確認できます。
機械学習の実験結果を管理するのはなかなかに大変ですが、Azure Machine Learningをうまく使うと、実験に使ったデータ、コード、結果をしっかりと管理することができます。

まとめ
jetbot_rosのRoad FollowingモデルのトレーニングをAzure Machine Learning上で行うことができました。
今後はこのMLパイプラインを活用し、Isaac Sim上で作成した合成データによるAIモデルトレーニングや、実機での動作検証などを行います。

