NVIDIA Isaac Simを利用することで、AIモデルのトレーニングに活用可能な合成モデルの生成やAIモデルのテスト・シミュレーションを行うことができます。
Road Followingを行うResNet18のNavigationのモデルを、仮想空間で生成した合成データを使いトレーイングし仮想空間・実機で動かす所まで行ったので、概要をまとめました。
合成データ生成からAIモデルを動かすまでの流れ
- Isaac Simを使いトレーニング用の合成データを生成する
- Azure Machine LearningのMLパイプラインを使いAIモデルをトレーニングする
- 完成したAIモデルを仮想空間と実機のJetBotで動かし、動作をテストする
本記事では1の合成データの生成の内容を記載します。
準備
合成データの生成にはNVIDIA Isaac Simを利用します。以下のリンクを参考に環境を構築します。
NVIDIA Isaac Simでの合成データ生成
Isaac Simで可能なこと
Isaac Simを活用することで、作成した3D仮想空間にランダムな変更を加え、画像データを生成することが可能です。
具体的には以下のようなことができます。
- 環境を変更する(事前に作成したファイルの環境を読み込む)
- 物体の配置を変更する
- 物体の色やテクスチャ、マテリアルを変更する
- ライティングの強さや色を変更する
- 物理シミュレーション
Pythonスクリプトを作成する
Isaac SimはPythonスクリプトでStandaloneとして起動することができます。スクリプトを実行することでIsaac Simの起動から合成データの生成・保存を行ことが可能です。
下記のチュートリアルをもとに、standalone applicationとして実行するスクリプトの説明をします。
フルのコードは以下をご覧ください。
- isaac_sim_install_path/standalone_examples/replicator/offline_generation/offline_generation.py
- isaac_sim_install_path/standalone_examples/replicator/offline_generation/offline_generation_utils.py
config
プロジェクトで利用する設定を記載します。
ここではデータのサイズやフレーム数、出力するデータの種類を記載しています。
writer_configで設定しているrgb,bounding_box_2d_tight, semantic_segmentation, などのデータが生成されます。
config = {
    "launch_config": {
        "renderer": "RayTracedLighting",
        "headless": False,
    },
    "resolution": [1024, 1024],
    "rt_subframes": 2,
    "num_frames": 20,
    "env_url": "/Isaac/Environments/Simple_Warehouse/full_warehouse.usd",
    "scope_name": "/MyScope",
    "writer": "BasicWriter",
    "writer_config": {
        "output_dir": "_out_offline_generation",
        "rgb": True,
        "bounding_box_2d_tight": True,
        "semantic_segmentation": True,
        "distance_to_image_plane": True,
        "bounding_box_3d": True,
        "occlusion": True,
    },
    "clear_previous_semantics": True,
    "forklift": {
        "url": "/Isaac/Props/Forklift/forklift.usd",
        "class": "Forklift",
    },
    "cone": {
        "url": "/Isaac/Environments/Simple_Warehouse/Props/S_TrafficCone.usd",
        "class": "TrafficCone",
    },
    "pallet": {
        "url": "/Isaac/Environments/Simple_Warehouse/Props/SM_PaletteA_01.usd",
        "class": "Pallet",
    },
    "cardbox": {
        "url": "/Isaac/Environments/Simple_Warehouse/Props/SM_CardBoxD_04.usd",
        "class": "Cardbox",
    },
}
StandaloneとしてIsaac Simを起動する
Isaac Simのインスタンスをstandalone applicationとして実行するには、以下のコードを記載します。
from omni.isaac.kit import SimulationApp

# launch_configの設定でsimulation appを作成
simulation_app = SimulationApp(launch_config=config["launch_config"])

import offline_generation_utils
# runtime modulesのimport (SimulationAppが作成された後にmoduleをインポートする)
import omni.replicator.core as rep
import omni.usd
from omni.isaac.core.utils import prims
from omni.isaac.core.utils.nucleus import get_assets_root_path
from omni.isaac.core.utils.rotations import euler_angles_to_quat
from omni.isaac.core.utils.stage import get_current_stage, open_stage
from pxr import Gf
usdステージの読み込み
利用する環境のusdステージを読み込みます。
# server pathを取得
assets_root_path = get_assets_root_path() #フルのnucleus pathを取得
if assets_root_path is None:
    carb.log_error("Could not get nucleus server path, closing application..")
    simulation_app.close()

# new stageで指定した環境を開く
print(f"Loading Stage {config['env_url']}")
if not open_stage(assets_root_path + config["env_url"]):
    carb.log_error(f"Could not open stage{config['env_url']}, closing application..")
    simulation_app.close()
CameraとWriterの作成
Isaac Simでデータを保存するにはReplicator APIを使い、以下のことを行います。
- Cameraを作成
- CameraからRender Productを作成
- Replicator writerを作成し、Render Productsをattachする
Replicator writersはデータをディスクに保存するために利用します。
次のコードでReplicator(rep.create.camera)を使い、カメラをステージに作成します。
driver_cam = rep.create.camera(
    focus_distance=400.0, focal_length=24.0, clipping_range=(0.1, 10000000.0), name="DriverCam"
)

# Camera looking at the pallet
pallet_cam = rep.create.camera(name="PalletCam")

# Camera looking at the forklift from a top view with large min clipping to see the scene through the ceiling
top_view_cam = rep.create.camera(clipping_range=(6.0, 1000000.0), name="TopCam")
Writerの作成と先ほど作成したカメラから、Render Productを作成しWriterへattachします。
# Setup the writer
writer = rep.WriterRegistry.get(config["writer"])
writer.initialize(**config["writer_config"])
forklift_rp = rep.create.render_product(top_view_cam, config["resolution"], name="TopView")
driver_rp = rep.create.render_product(driver_cam, config["resolution"], name="DriverView")
pallet_rp = rep.create.render_product(pallet_cam, config["resolution"], name="PalletView")
writer.attach([forklift_rp, driver_rp, pallet_rp])
Isaac Sim APIやReplicator APIでのDomain Randomization
ランダムに変更する要素の設定を行います。
Isaac Simでは、Isaac Sim APIやReplicator APIを使うことで物体の配置やビジュアルを変更することができます。
Isaac Sim API Randomization
次のコードは、Isaac Sim APIを使いフォークリフトをランダムなポーズで配置し、パレットをフォークリフトの前に配置します。# 新しいフォークリフトをランダムのポーズで配置 forklift_prim = prims.create_prim( prim_path="/World/Forklift", position=(random.uniform(-20, -2), random.uniform(-1, 3), 0), orientation=euler_angles_to_quat([0, 0, random.uniform(0, math.pi)]), usd_path=assets_root_path + config["forklift"]["url"], semantic_label=config["forklift"]["class"], ) # パレットをフォークリフトの前にランダムな距離(オフセット)で配置 forklift_tf = omni.usd.get_world_transform_matrix(forklift_prim) pallet_offset_tf = Gf.Matrix4d().SetTranslate(Gf.Vec3d(0, random.uniform(-1.2, -1.8), 0)) pallet_pos_gf = (pallet_offset_tf * forklift_tf).ExtractTranslation() forklift_quat_gf = forklift_tf.ExtractRotationQuat() forklift_quat_xyzw = (forklift_quat_gf.GetReal(), *forklift_quat_gf.GetImaginary()) pallet_prim = prims.create_prim( prim_path="/World/Pallet", position=pallet_pos_gf, orientation=forklift_quat_xyzw, usd_path=assets_root_path + config["pallet"]["url"], semantic_label=config["pallet"]["class"], )
Replicator Randomization Graph
次のコードは、オブジェクトをランダムに配置するための関数(scatter_boxes())を定義し、その関数をrandomizer graphに登録するものです。パレット(pallet_prim)上にボックス(cardboxes)を散布する処理を行います。# ボックスとマテリアルのrandomizer graphを登録 def register_scatter_boxes(pallet_prim, assets_root_path, config): #散布平面(scatter_plane)を作成するために、オブジェクト(pallet_prim)の境界を計算する。 bb_cache = create_bbox_cache() bbox3d_gf = bb_cache.ComputeLocalBound(pallet_prim) prim_tf_gf = omni.usd.get_world_transform_matrix(pallet_prim) # バウンディングボックスを計算 bbox3d_gf.Transform(prim_tf_gf) range_size = bbox3d_gf.GetRange().GetSize() # オブジェクトのワールド変換行列(prim_tf_gf)を取得し、バウンディングボックスをワールド座標系に変換。 #オブジェクトの回転情報を取得し、xyzwフォーマットで格納。 prim_quat_gf = prim_tf_gf.ExtractRotation().GetQuaternion() prim_quat_xyzw = (prim_quat_gf.GetReal(), *prim_quat_gf.GetImaginary()) # パレットの上にボックスを散布するための可視化されない平面(scatter_plane)を作成。 plane_scale = (range_size[0] * 0.8, range_size[1] * 0.8, 1) plane_pos_gf = prim_tf_gf.ExtractTranslation() + Gf.Vec3d(0, 0, range_size[2]) plane_rot_euler_deg = quat_to_euler_angles(np.array(prim_quat_xyzw), degrees=True) scatter_plane = rep.create.plane( scale=plane_scale, position=plane_pos_gf, rotation=plane_rot_euler_deg, visible=False ) #使用するマテリアルのリスト cardbox_mats = [ f"{assets_root_path}/Isaac/Environments/Simple_Warehouse/Materials/MI_PaperNotes_01.mdl", f"{assets_root_path}/Isaac/Environments/Simple_Warehouse/Materials/MI_CardBoxB_05.mdl", ] def scatter_boxes(): cardboxes = rep.create.from_usd( assets_root_path + config["cardbox"]["url"], semantics=[("class", config["cardbox"]["class"])], count=5 ) with cardboxes: rep.randomizer.scatter_2d(scatter_plane, check_for_collisions=True) rep.randomizer.materials(cardbox_mats) return cardboxes.node rep.randomizer.register(scatter_boxes)
ライティングのRandomization
ライティングもReplicator Randomization Graphを使うことが可能です。次のコードは、フォークリフトとパレットの上方に3つのライトをランダムに配置します。
# light randomization graphの登録
def register_lights_placement(forklift_prim, pallet_prim):
    bb_cache = create_bbox_cache()
    combined_range_arr = compute_combined_aabb(bb_cache, [forklift_prim.GetPrimPath(), pallet_prim.GetPrimPath()])
    pos_min = (combined_range_arr[0], combined_range_arr[1], 6)
    pos_max = (combined_range_arr[3], combined_range_arr[4], 7)

    def randomize_lights():
        lights = rep.create.light(
            light_type="Sphere",
            color=rep.distribution.uniform((0.2, 0.1, 0.1), (0.9, 0.8, 0.8)), #色をランダムに選択
            intensity=rep.distribution.uniform(500, 2000), #光の強さをランダムに選択
            position=rep.distribution.uniform(pos_min, pos_max), #配置場所をランダムに選択
            scale=rep.distribution.uniform(5, 10), #大きさをランダムに選択
            count=3,
        )
        return lights.node

    rep.randomizer.register(randomize_lights)
Replicator Randomizationの実行とカメラの位置の変更
次のコードでは登録したReplicator Randomizationを実行によってオブジェクトの配置を変更し、カメラの位置も配置されたオブジェクトを基準にランダムに配置します。# 毎フレーム実行されるgraph nodesを生成 with rep.trigger.on_frame(): #登録したscatter_boxes()とrandomize_lights()の実行 rep.randomizer.scatter_boxes() rep.randomizer.randomize_lights() #カメラの位置の変更 pallet_cam_min = (pallet_pos_gf[0] - 2, pallet_pos_gf[1] - 2, 2) pallet_cam_max = (pallet_pos_gf[0] + 2, pallet_pos_gf[1] + 2, 4) with pallet_cam: rep.modify.pose( position=rep.distribution.uniform(pallet_cam_min, pallet_cam_max), look_at=str(pallet_prim.GetPrimPath()), ) driver_cam_min = (driver_cam_pos_gf[0], driver_cam_pos_gf[1], driver_cam_pos_gf[2] - 0.25) driver_cam_max = (driver_cam_pos_gf[0], driver_cam_pos_gf[1], driver_cam_pos_gf[2] + 0.25) with driver_cam: rep.modify.pose( position=rep.distribution.uniform(driver_cam_min, driver_cam_max), look_at=str(pallet_prim.GetPrimPath()), ) # 5フレーム毎にカメラの配置位置をフォークリフトの場所を基準にランダムで決定します。 with rep.trigger.on_frame(interval=5): top_view_cam_min = (foklift_pos_gf[0], foklift_pos_gf[1], 9) top_view_cam_max = (foklift_pos_gf[0], foklift_pos_gf[1], 11) with top_view_cam: rep.modify.pose( position=rep.distribution.uniform(top_view_cam_min, top_view_cam_max), rotation=rep.distribution.uniform((0, -90, -30), (0, -90, 30)), )
Replicatorがサポートしている他のRandomizationに関しては以下で確認できます。
Randomizer Examples — Omniverse Extensions latest documentation
シミュレーションの実行
Isaac Sim APIを使いphysics simulationを実行することができます。
以下の例では、ボックスをパレットの上へ落とすためにシミュレーションを実行します。
def simulate_falling_objects(forklift_prim, assets_root_path, config, max_sim_steps=250, num_boxes=8):
    # physics simulationsを実行するために、isaac sim worldを作成
    world = World(physics_dt=1.0 / 90.0, stage_units_in_meters=1.0)

    # Set a random relative offset to the pallet using the forklift transform as a base frame
    forklift_tf = omni.usd.get_world_transform_matrix(forklift_prim)
    pallet_offset_tf = Gf.Matrix4d().SetTranslate(Gf.Vec3d(random.uniform(-1, 1), random.uniform(-4, -3.6), 0))
    pallet_pos = (pallet_offset_tf * forklift_tf).ExtractTranslation()

    # Spawn pallet prim at a relative random offset to the forklift
    [..]

    # Spawn boxes falling on the pallet
    for i in range(num_boxes):
        # Spawn box prim
        cardbox_prim_name = f"SimulatedCardbox_{i}"
        box_prim = prims.create_prim(
            prim_path=f"/World/{cardbox_prim_name}",
            usd_path=assets_root_path + config["cardbox"]["url"],
            semantic_label=config["cardbox"]["class"],
        )

        # Get the next spawn height for the box
        spawn_height += bb_cache.ComputeLocalBound(box_prim).GetRange().GetSize()[2] * 1.1

        # Wrap the cardbox prim into a rigid prim to be able to simulate it
        box_rigid_prim = RigidPrim(
            prim_path=str(box_prim.GetPrimPath()),
            name=cardbox_prim_name,
            position=pallet_pos + Gf.Vec3d(random.uniform(-0.2, 0.2), random.uniform(-0.2, 0.2), spawn_height),
            orientation=euler_angles_to_quat([0, 0, random.uniform(0, math.pi)]),
        )

        # Make sure physics are enabled on the rigid prim
        box_rigid_prim.enable_rigid_body_physics()

        # Register rigid prim with the scene
        world.scene.add(box_rigid_prim)

    # Reset the world to handle the physics of the newly created rigid prims
    world.reset()

    # Simulate the world for the given number of steps or until the highest box stops moving
    last_box = world.scene.get_object(f"SimulatedCardbox_{num_boxes - 1}")
    for i in range(max_sim_steps):
        world.step(render=False)
        if last_box and np.linalg.norm(last_box.get_linear_velocity()) < 0.001:
            print(f"Falling objects simulation finished at step {i}..")
            break
スクリプトの実行
randomizations と frame writing を指定したフレーム数実行し、すべてのデータがディスクに書き込みされた後にアプリケーションを閉じます。
# Register randomizers graphs
offline_generation_utils.register_scatter_boxes(pallet_prim, assets_root_path, config)
offline_generation_utils.register_lights_placement(forklift_prim, pallet_prim)

[..]

# Run a simulation before generating data
offline_generation_utils.simulate_falling_objects(forklift_prim, assets_root_path, config)

[..]

# Run the SDG
rep.orchestrator.run_until_complete(num_frames=config["num_frames"])

simulation_app.close()
AIモデルトレーニング用の合成データ生成
上記のコードをもとに、Road Followingを行うAIモデルのトレーニング用合成データを生成するようにスクリプトを作成しました。
AIモデルの検出対象である道をステージに配置し、道の上のランダムなポイントにカメラ(JetBot)を配置し合成データを生成します。
また、特定のフレーム毎に以下の要素をランダムに変更するように設定しました。
- 環境(usdステージ)
- 物体(道)のテクスチャ
- ライティング
生成された合成データ
作成したスクリプトを実行することで、以下のような合成データが生成されます。
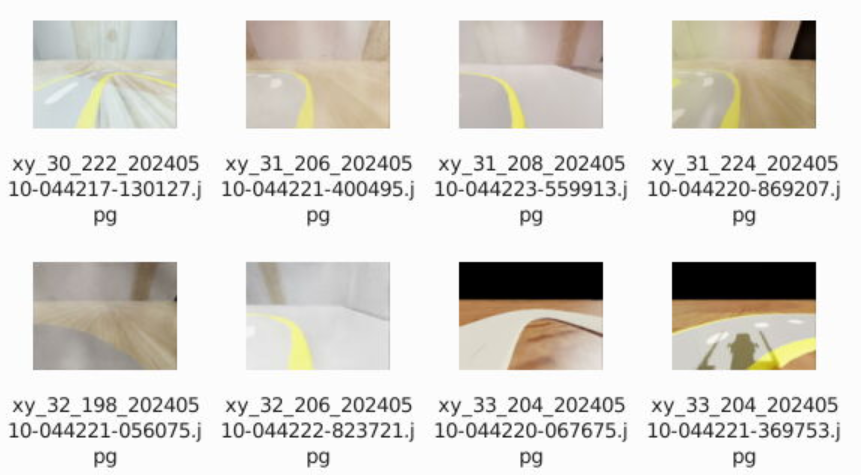
生成された合成データを使いAzure MLパイプラインでAIモデルをトレーニング後、実際に仮想空間と実機でAIモデルを動かします。
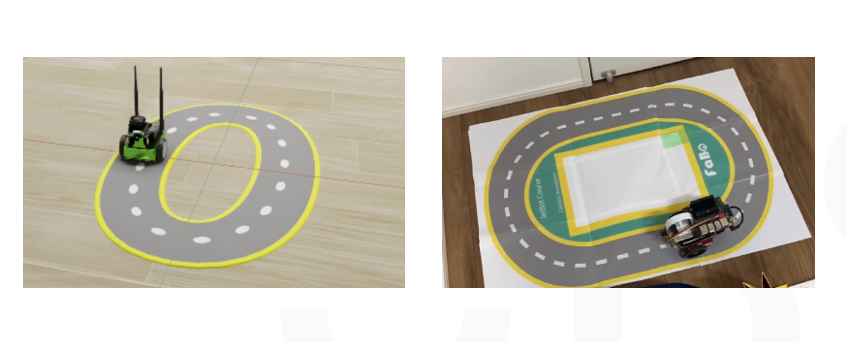
仮想環境・実機での動作確認
仮想環境
仮想環境では、テストで作成したステージの道に沿って動作することができました。
youtu.be
実機
youtu.be
実機での検出精度は多少低いですが、仮想空間を修正しデータセットの調整することで精度の改善もできたので、現実に近い環境の作成を行うことでより精度の高いAIモデルの構築も可能かと思います。
終わりに
今回はIsaac Simを活用し、現実で活用可能なAIモデルをトレーニング可能かを試してみました。
仮想環境をAIモデルトレーニング・テストに活用することで、データセットの再生成や動作の確認を効率よく繰り返すことができました。
実機と仮想環境の差によってAIモデルの精度に影響はありましたが、現実に近い環境を再現する、またはライティングなど多様な環境を用意しデータセットに含めることで、ロバスト性の高いモデルのトレーニングによる影響も試してみたいです。