ROS2やロボット制御の技術習得を目的に「自動運転AIチャレンジ」という大会に参加したので、開発で取り組んだ一部を記載します。
ROSや車両制御に関しては、ほとんど知識ゼロでの参加になります。
大会の詳細は以下のリンクでご確認いただけます。
2024大会 開催概要|自動運転AIチャレンジ公式ホームページ
環境構築
自動運転AIチャレンジでは、AWSIMとAutowareの二つの自動運転システム用オープンソースソフトウェアを利用します。
環境構築は以下のリンクに従い行います。
automotiveaichallenge.github.io
環境構築の手順を「大会用リポジトリのビルド・実行」まで完了すると、開発を行う準備が完了します。
シミュレーションを実行すると以下のような画面が開かれます。

開発
開発は以下の情報をもとに進めていきます。
automotiveaichallenge.github.io
まず進め方の中に記載されている「パラメータを変更してみる」を試し、動作にどのような影響があるか確認しました。
パラメーターの変更
aichallenge-2024/aichallenge/workspace/src/aichallenge_submit/aichallenge_submit_launch/launch/reference.launch.xmlのファイルに記載されている、次のパラメーターを変更することが可能です。
<node pkg="simple_pure_pursuit" exec="simple_pure_pursuit" name="simple_pure_pursuit_node" output="screen">
    <param name="use_external_target_vel" value="true"/>
    <param name="external_target_vel" value="8.0"/>
    <param name="lookahead_gain" value="0.4"/>
    <param name="lookahead_min_distance" value="5.0"/>
    <param name="speed_proportional_gain" value="1.0"/>
上記のパラメーターは、simple_pure_pursuit_nodeのパッケージを実行する際の値を設定しています。
simple_pure_pursuit_nodeのコードを確認すると、external_target_velは車両の目標速度、lookahead_gainとlookahead_min_distanceはステアリング角度を調整するために利用されていることがわかります。
 // calc longitudinal speed and acceleration
 // external_target_velの値が適用される
    double target_longitudinal_vel =
      use_external_target_vel_ ? external_target_vel_ : closet_traj_point.longitudinal_velocity_mps;
    double current_longitudinal_vel = odometry_->twist.twist.linear.x;
...
// calc lateral control
    //// calc lookahead distance
    double lookahead_distance = lookahead_gain_ * target_longitudinal_vel + lookahead_min_distance_;
    //// calc center coordinate of rear wheel
    double rear_x = odometry_->pose.pose.position.x -
                    wheel_base_ / 2.0 * std::cos(odometry_->pose.pose.orientation.z);
    double rear_y = odometry_->pose.pose.position.y -
                    wheel_base_ / 2.0 * std::sin(odometry_->pose.pose.orientation.z);
    //// search lookahead point
    // 車両の後輪の位置から lookahead_distance 以上離れた最初の軌道点(lookahead point)を見つけます。見つけられない場合は、軌道の最後の点を使用します。
    auto lookahead_point_itr = std::find_if(
      trajectory_->points.begin() + closet_traj_point_idx, trajectory_->points.end(),
      [&](const TrajectoryPoint & point) {
        return std::hypot(point.pose.position.x - rear_x, point.pose.position.y - rear_y) >=
               lookahead_distance;
      });
    if (lookahead_point_itr == trajectory_->points.end()) {
      lookahead_point_itr = trajectory_->points.end() - 1;
    }
    double lookahead_point_x = lookahead_point_itr->pose.position.x;
    double lookahead_point_y = lookahead_point_itr->pose.position.y;

    // calc steering angle for lateral control
    // 車両の後輪位置とlookahead pointの間の角度差 alpha を計算し、その角度差を使用してステアリング角度を求めます。
    double alpha = std::atan2(lookahead_point_y - rear_y, lookahead_point_x - rear_x) -
                   tf2::getYaw(odometry_->pose.pose.orientation);
    cmd.lateral.steering_tire_angle =
      std::atan2(2.0 * wheel_base_ * std::sin(alpha), lookahead_distance);
lookahead_pointの最適化
lookahead_pointを調整することで、カーブを正確に曲がることができることが分かったので、lookahead_gainとlookahead_min_distanceの値を変更します。
ここで問題となるのが、直観的にlookahead_pointがどの位置にあるかわからないことでした。そこで、lookahead_pointをRvizに表示し、どのあたりの点を使用しているか可視化を行いました。
lookahead_pointをTopicにpublishする
今回の目的はlookahead_pointをRviz上に可視化することなので、PointStampedのメッセージを定義しTopicにpublishします。
simple_pure_pursuit.cppにTopicにpublishするためのコードを追加します。
#include <geometry_msgs/msg/point_stamped.hpp>
...
  pub_cmd_ = create_publisher<AckermannControlCommand>("output/control_cmd", 1);
  // lookahead point可視化のために追加
  pub_lookahead_point_ = create_publisher<PointStamped>("output/lookahead_point", 1);
...
    double lookahead_point_x = lookahead_point_itr->pose.position.x;
    double lookahead_point_y = lookahead_point_itr->pose.position.y;

    // lookahead_pointをパブリッシュ // lookahead point可視化のために追加
    geometry_msgs::msg::PointStamped lookahead_point_msg;
    lookahead_point_msg.header.stamp = get_clock()->now();
    lookahead_point_msg.header.frame_id = "map";
    lookahead_point_msg.point.x = lookahead_point_x;
    lookahead_point_msg.point.y = lookahead_point_y;
    lookahead_point_msg.point.z = 0;
    pub_lookahead_point_->publish(lookahead_point_msg);

    // calc steering angle for lateral control
...
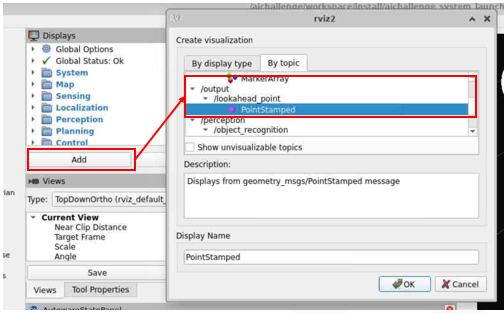
コード追加・再ビルドが完了後にシミュレーションを実行し、追加したtopicがpublishされているか確認します。
ros2 topic listのコマンドまたは、Rvizを開き以下の手順で確認可能です。

rvizファイルを修正し、lookahead_pointを可視化する
aichallenge-2024/aichallenge/workspace/src/aichallenge_system/aichallenge_system_launch/config/autoware.rvizのファイルのVisualization Manager > Displays下に、次のコードを追加します。
...
- Class: rviz_common/Group
      Displays:
        - Class: rviz_default_plugins/PointStamped
          Enabled: true
          Name: Lookahead Point
          Namespace: ""
          Queue Size: 10
          Radius: 1.5
          Topic: /output/lookahead_point
          Color: 255; 0; 0
      Name: Lookahead
      Enabled: true
...
※既存の設定ではScenarioTrajectoryのpath(緑色の線)の表示と重なりlookahead_pointを確認できないため、ScenarioTrajectory > view pathのAlphaの値を下げることで、重なっているlookahead_pointを表示することができます。
修正が完了するとlookahead_pointを可視化しパラメーターの変更が可能となります。

最後に
今回はパラメーター調整のためにRviz上に情報を追加する方法を記載しました。
本記事では大会予選に向けパラメーターを変更することでの車両制御の改善のみに触れましたが、コードの修正やパッケージ追加等することでの改善も可能なので、そういった内容も記載できたらと思います。

