
はじめに
Azure仮想マシンのイメージ管理をAzure Compute Galleryに移行したうえで、もともと使っていたARM Templateはあまり大きく変えることなく動作させることが出来ました。
Azure Compute Galleryと、本記事で扱うBicepに直接の関係は無いのですが、ARM Templateをよりシンプルに扱いやすくできるそうなので、折角なのでBicepを使ってAzure Compute Galleryから展開できるようにしたいと思います。
ただ、本記事ではまずは対象リソースを削って、ARM TemplateからBicepへの移行の道すじを探っておきたいと思います。
そもそもBicepとは
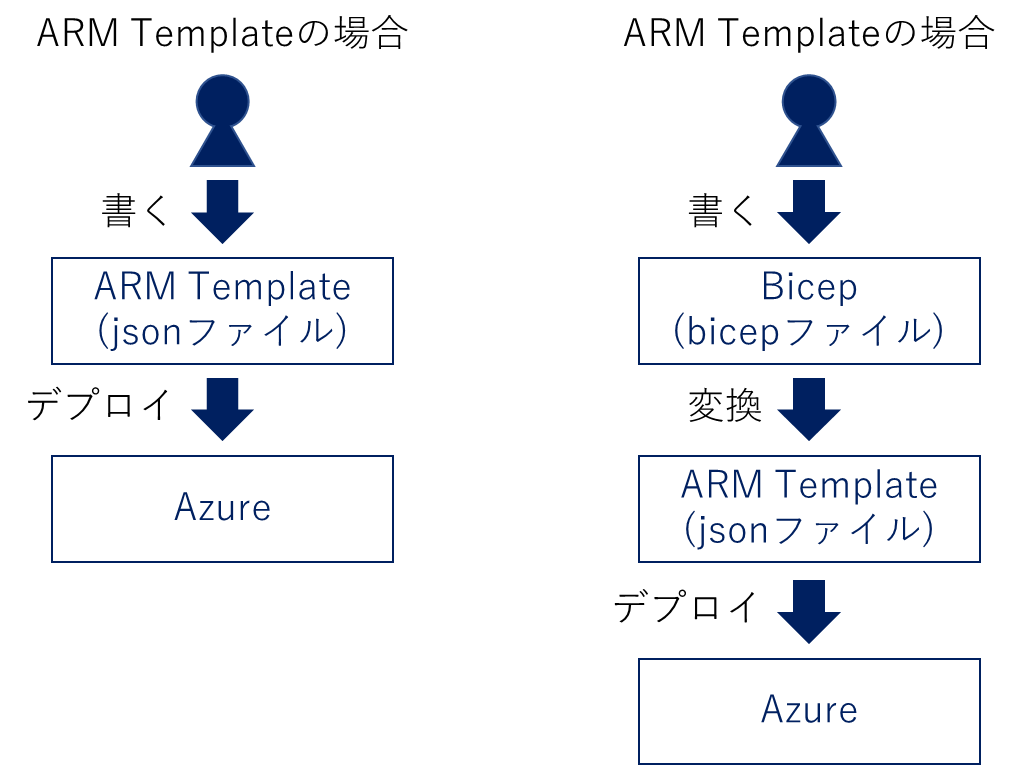
ARM Templateとは図の様な関係性のようです。
Azure リソースをデプロイするための Bicep 言語 - Azure Resource Manager | Microsoft Learn
層が増えて一見手間が増えたようにも見えますが、実際にはbicepファイルを作れば、ARM Templateへの変換は裏でやってくれるので、利用者の負担が増えるわけではありません。むしろ、直接jsonを編集する事に比べると楽になるようです。*1
Bicep利用のために
必要なものは大きく二つです。
- デプロイ用のツール(Bicep CLI)
- コーディング用のツール
前者は必須になります。Azure CLIなのかPowerShellなのか、などでインストール方法は異なってくるので詳しくは下記を参照してください。
後者ですが、Visual Studio または Visual Studio Code のBicep 拡張があると便利です。こちらは必須ではないのですが、Bicep使うのであれば入れておいた方が楽だと思います。
※ 本記事では拡張機能など準備に関する詳細は割愛していますが、JBS Tech Blgoで他の方が書いた記事が参考になりますので、併せてご覧ください。
検証用のARM Templateを用意する
連番で複数の仮想マシンのセットを作る、というARM Templateがあってそれを使おうとしたのですが、いきなりBicepに変換するには複雑すぎたので、実際に使用しているARM Templateからリソースを大幅に削って簡略化したものをここでは用意しました。
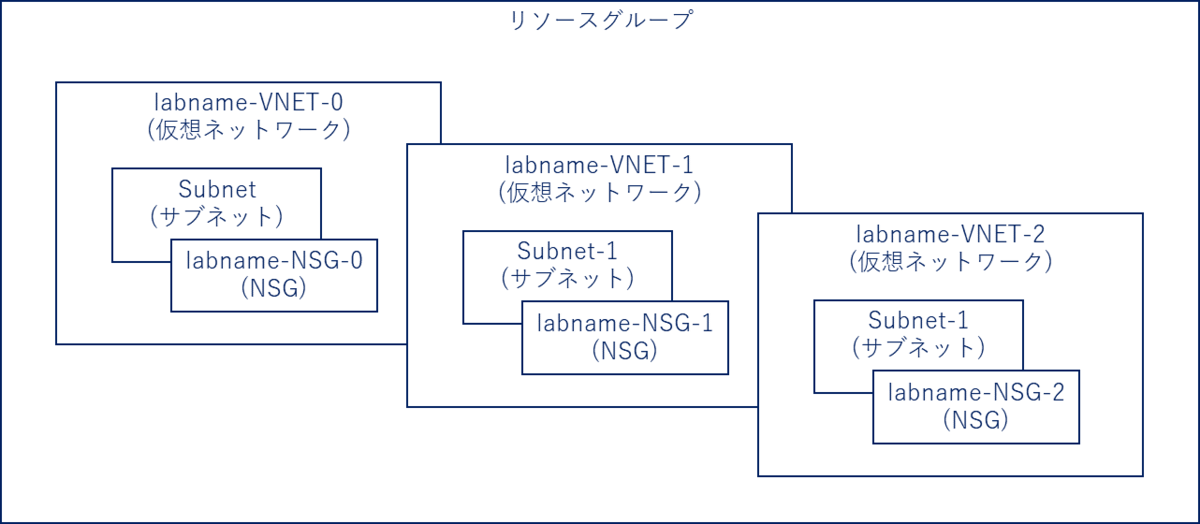
連番で複数の仮想ネットワークとNSGを作る、というものになります。
作成されるリソース
作成イメージはこんな感じです。
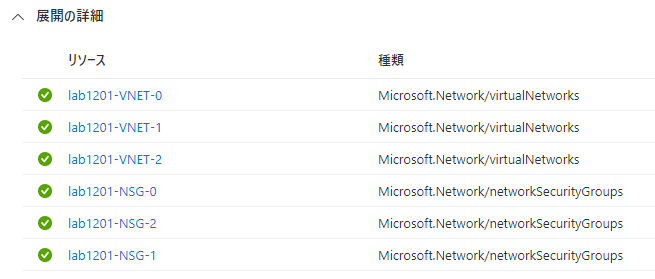
実際にデプロイした様子です。
テンプレートファイル
使用したテンプレートファイルはこのようになっています。パラメーター、変数、ループ、依存関係など、変換時に引っかかりそうな要素がいくつか入っています。
{
    "$schema": "https://schema.management.azure.com/schemas/2019-04-01/deploymentTemplate.json#",
    "contentVersion": "1.0.0.0",
    "parameters": {
        "numberOfInstances": {
            "defaultValue": 1,
            "minValue": 1,
            "maxValue": 20,
            "type": "Int",
            "metadata": {
                "description": "Number of VNET Sets to deploy"
            }
        },
        "labName": {
            "type": "String",
            "metadata": {
                "description": "Unique Prefix. ex) lab1201"
            }
        }
    },
    "variables": {
        "addressPrefix": "10.0.0.0/16",
        "subnet1Name": "Subnet-1",
        "subnet1Prefix": "10.0.0.0/24",
        "location": "westus2"
    },
    "resources": [
        {
            "type": "Microsoft.Network/networkSecurityGroups",
            "apiVersion": "2019-08-01",
            "name": "[concat(parameters('labName'),'-NSG-',copyindex())]",
            "location": "[variables('location')]",
            "properties": {
                "securityRules": [
                    {
                        "name": "default-allow-RDP",
                        "properties": {
                            "priority": 1000,
                            "access": "Allow",
                            "direction": "Inbound",
                            "destinationPortRange": "3389",
                            "protocol": "Tcp",
                            "sourceAddressPrefix": "*",
                            "sourcePortRange": "*",
                            "destinationAddressPrefix": "*"
                        }
                    }
                ]
            },
            "copy": {
                "name": "nsg-Loop",
                "count": "[parameters('numberOfInstances')]"
            }
        },
        {
            "type": "Microsoft.Network/virtualNetworks",
            "apiVersion": "2016-03-30",
            "name": "[concat(parameters('labName'),'-VNET-',copyindex())]",
            "location": "[variables('location')]",
            "dependsOn": [
                "[resourceId('Microsoft.Network/networkSecurityGroups', concat(parameters('labName'),'-NSG-',copyindex()))]"
            ],
            "properties": {
                "addressSpace": {
                    "addressPrefixes": [
                        "[variables('addressPrefix')]"
                    ]
                },
                "subnets": [
                    {
                        "name": "[variables('subnet1Name')]",
                        "properties": {
                            "addressPrefix": "[variables('subnet1Prefix')]",
                            "networkSecurityGroup": {
                                "id": "[resourceId('Microsoft.Network/networkSecurityGroups', concat(parameters('labName'),'-NSG-',copyindex()))]"
                            }
                        }
                    }
                ]
            },
            "copy": {
                "name": "vnet-Loop",
                "count": "[parameters('numberOfInstances')]"
            }
        }
    ]
}
パラメーターファイル
前出のテンプレートとセットで使用するパラメーターファイルです。
{
    "$schema": "https://schema.management.azure.com/schemas/2019-04-01/deploymentParameters.json#",
    "contentVersion": "1.0.0.0",
    "parameters": {
          "numberOfInstances": {
              "value": (作成したいリソースのセット数)
          }
      }
  }
デプロイ用のPowershellスクリプト
テンプレートファイルとパラメーターファイルを使ってデプロイするためのスクリプトです。
$labName = "(任意の英数字。lab1201など)"

$location = "westus2"
$today=Get-Date -Format "yyyy-MM-dd-hh-mm"
$deployName = $labName + "-Deploy-" + $today

$SubscriptionID = "(サブスクリプションID)"

Connect-AzAccount

$context = Get-AzSubscription -SubscriptionId $SubscriptionID
Set-AzContext $context

New-AzResourceGroup -Name $labName -Location $location
New-AzResourceGroupDeployment -Name $deployName -ResourceGroupName $labName `
  -TemplateFile "(テンプレートファイル名:例:test-template.json)" `
  -TemplateParameterFile "(パラメーターファイル名:例:test-template.parameter.json)" `
  -labName $labName
Bicepファイルの作成
ARM Templateのテンプレートファイルの変換
ARM Templateのテンプレートファイルは、Bicep形式に変換する事が出来ます。
参考:ARM テンプレート JSON を Bicep に逆コンパイルする - Azure Resource Manager | Microsoft Learn
上記のサイトにコマンドは書いてあるのですが、Azure CLIコマンド用しかきちんと書かれていません。Azure CLIが無い場合は以下の様になります。
bicep decompile test-template.json
実行すると、いくつか警告やエラーが出ていますが、Bicepファイルが出力されました。エラーがあるのでこのままは使えないのですが、ずいぶんすっきりしましたね。
@description('Number of VNET Sets to deploy')
@minValue(1)
@maxValue(20)
param numberOfInstances int = 1

@description('Unique Prefix. ex) lab1201')
param labName string

var addressPrefix = '10.0.0.0/16'
var subnet1Name = 'Subnet-1'
var subnet1Prefix = '10.0.0.0/24'
var location = 'westus2'

resource labName_NSG 'Microsoft.Network/networkSecurityGroups@2019-08-01' = [for i in range(0, numberOfInstances): {
  name: '${labName}-NSG-${i}'
  location: location
  properties: {
    securityRules: [
      {
        name: 'default-allow-RDP'
        properties: {
          priority: 1000
          access: 'Allow'
          direction: 'Inbound'
          destinationPortRange: '3389'
          protocol: 'Tcp'
          sourceAddressPrefix: '*'
          sourcePortRange: '*'
          destinationAddressPrefix: '*'
        }
      }
    ]
  }
}]

resource labName_VNET 'Microsoft.Network/virtualNetworks@2016-03-30' = [for i in range(0, numberOfInstances): {
  name: '${labName}-VNET-${i}'
  location: location
  properties: {
    addressSpace: {
      addressPrefixes: [
        addressPrefix
      ]
    }
    subnets: [
      {
        name: subnet1Name
        properties: {
          addressPrefix: subnet1Prefix
          networkSecurityGroup: {
            id: resourceId('Microsoft.Network/networkSecurityGroups', '${labName}-NSG-${i}')
          }
        }
      }
    ]
  }
  dependsOn: [
    resourceId('Microsoft.Network/networkSecurityGroups', '${labName}-NSG-${i}')
  ]
}]
生成されたBicepファイルの修正
エラーは、仮想ネットワークの依存関係の設定で発生していました。
  dependsOn: [
    resourceId('Microsoft.Network/networkSecurityGroups', '${labName}-NSG-${i}')
  ]
依存関係の書き方をBicepのお作法に書き換えます。
  dependsOn: [
    labName_NSG
  ]
修正後のBicepファイルです。今回は1行変更しただけでした。
@description('Number of VNET Sets to deploy')
@minValue(1)
@maxValue(20)
param numberOfInstances int = 1

@description('Unique Prefix. ex) lab1201')
param labName string

var addressPrefix = '10.0.0.0/16'
var subnet1Name = 'Subnet-1'
var subnet1Prefix = '10.0.0.0/24'
var location = 'westus2'

resource labName_NSG 'Microsoft.Network/networkSecurityGroups@2019-08-01' = [for i in range(0, numberOfInstances): {
  name: '${labName}-NSG-${i}'
  location: location
  properties: {
    securityRules: [
      {
        name: 'default-allow-RDP'
        properties: {
          priority: 1000
          access: 'Allow'
          direction: 'Inbound'
          destinationPortRange: '3389'
          protocol: 'Tcp'
          sourceAddressPrefix: '*'
          sourcePortRange: '*'
          destinationAddressPrefix: '*'
        }
      }
    ]
  }
}]

resource labName_VNET 'Microsoft.Network/virtualNetworks@2016-03-30' = [for i in range(0, numberOfInstances): {
  name: '${labName}-VNET-${i}'
  location: location
  properties: {
    addressSpace: {
      addressPrefixes: [
        addressPrefix
      ]
    }
    subnets: [
      {
        name: subnet1Name
        properties: {
          addressPrefix: subnet1Prefix
          networkSecurityGroup: {
            id: resourceId('Microsoft.Network/networkSecurityGroups', '${labName}-NSG-${i}')
          }
        }
      }
    ]
  }
  dependsOn: [
    labName_NSG
  ]
}]
実行用のPowerShellスクリプトを修正する
続いて、実行用のPowerShellスクリプトの修正なんですが、これはもう本当にシンプルで、New-AzResourceGroupDeploymentの-TemplateFileの参照ファイルをBicepファイルに変えるだけでした。
実行結果
問題なくリソースを作成する事が出来ました。
終わりに
正直、変数の文字列を結合する部分かループの処理あたりでエラーが出るだろうと思ったのですが、表示抜けするほど簡単でした。
まだBicepに最適化した書き方になっていない部分もありそうですが、変換してちょっと手直しして使うだけでも今後のメンテナンスが簡単になりそうだと感じました。
次回はいよいよ、Azure Compute Galleryからの仮想マシンのデプロイを、Bicepで実行していきたいと思います。
*1:ARM(腕)の上にあるからBicep(上腕二頭筋)という説もあるのですが本当ですかね…?

舟越 匠(日本ビジネスシステムズ株式会社)
人材開発部に所属。社内向けの技術研修をメインにしつつ、JBS Tech BlogやMS認定資格取得の推進役もやっています。資格としてはAzure Solutions Architect Expertを所持。好きなサービスはPower Automate / Logic Apps。好きなアーティストはZABADAK。
担当記事一覧